I had a simple MDF plywood desk, but it was time for a new one. The desk was worn through the surface because of the computer mouse and was a bit floppy. With the addition of a new 27″ monitor, it was getting a bit cramped. I decided with my woodworking tools I could make a better desk of my own.
Design
My original idea was to make a double-wide desk with cabinets in the middle and space for a tower PC. However as wood prices soared in the 2020 lockdown, I decided on a more moderate desk with live edge wood as the top. I purchased a unique live edge walnut slab from the Slab Shack, a local sawmill, and left it in the basement for about a year to dry (Not because I was putting off the project at all. Why would you even think that??). The slab was 2 inches deep, 8.5 feet long, and tapered from 40 inches at the wides to just 18 inches at the other end.
The 18-inch wide section wasn’t going to be a very useful desk space, so cutting two 45-degree miters through it left me with a waterfall edge leg made from the slab. The surface area of the cuts was large enough that I felt a butt joint of the wood would hold well enough, so they got a simple glue up.

The Other Leg
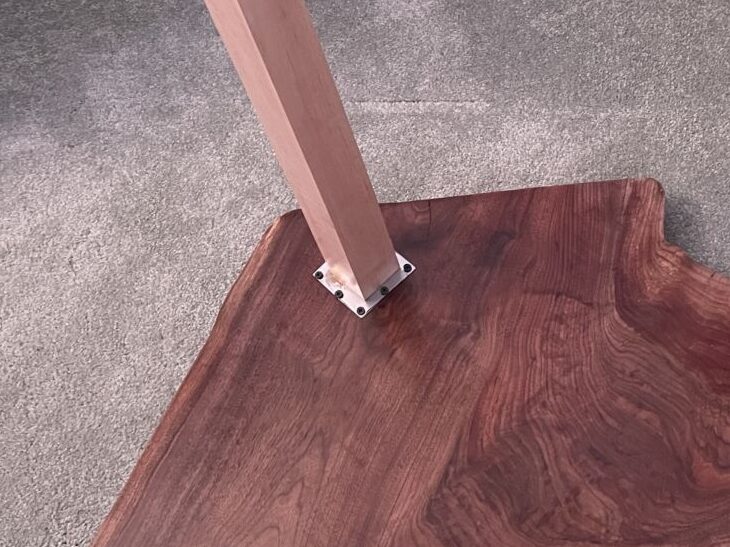
The other side of the desk still needed a leg, and I picked a trapezoidal shape for it. The leg was made out of curly maple to create a nice contrast between it and the rest of the table. Because 2-inch wide legs had much less surface area, they needed additional reinforcement. This is the main failure I faced with this project. I only had access to a biscuit jointer and some ill-fitting biscuits. The too-big biscuits didn’t fit well at all. They expanded because of the wood glue, and the leg joints did not fully close.
The maple leg had to be attached somehow, and I found the best way to be an intermediate steel plate. At 2.75″ by 2.75″ the plate just overlapped the leg to allow drywall screws to hold it to the desktop. Two drywall screws held the leg to the plate. I had my concerns about torque on the screws causing the wobble, but the construction held surprisingly well.

Results
After 6+ hours of sanding and sanding and sanding, I finally finished the desk. I then finished with coats of Minwax water-based polyurethane, but wouldn’t recommend this finish for desks. It takes months to fully cure, and until then water, oil, and heavy objects can mess with the finish. I had experience with it though, and decided it was fine to wait.
As a result, I was left with a much larger and more stable desk. The walnut included knotted wood from a split in the tree, which left amazing grain patterns.
As I got my computer set up on it, I 3D printed some cable clips to hide as much of the wires as possible. They were printed on the Anycubic Photon Mono X in Satyatech Fast Resin which has been a great combination for me. It’s not recommended for beginners though because of the dangers of photopolymer resin.

Like the look? We don’t sell desks, but have a bunch of black walnut cutting boards that can be shopped here!


thank you for the article